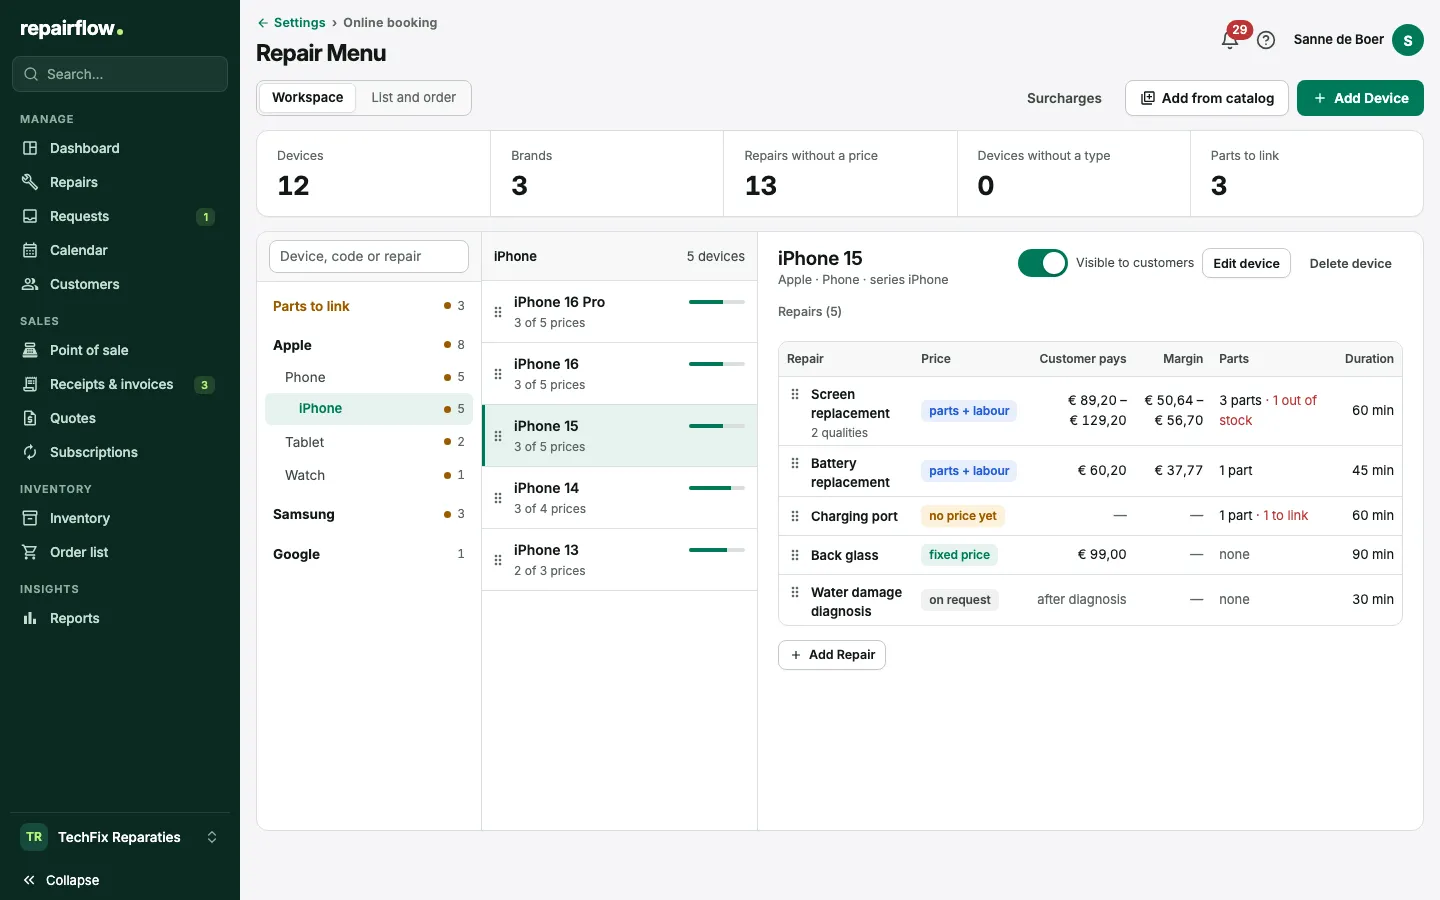
The Repair Menu is the list of devices and repairs your customers choose from on your booking page. For each repair you set the price: a fixed price, on request, or built from parts in your stock plus labour. You use the same menu at the till and in quotes. If you offer a repair in more qualities, such as Original and Budget, the customer chooses which one they want.
Where to find it
At the bottom left of the sidebar, click the row with your shop name, choose Shop settings and in the group Online booking go to Repair Menu. A manager also gets there directly through Online booking in the Shop menu.
First you see an overview card with the number of Devices and Brands, the Repairs without a price, the Devices without a type and the Parts to link, and below that the device types per brand. With Open repair menu you open the menu across the full width of the screen. With Settings at the top left you go back.
Workspace and List and order
At the top you choose one of two views:
- Workspace: on the left the tree with brand, type and series, in the middle the devices of what you choose there, with for each device how many repairs already have a price (for example 2 of 3 prices), and on the right the repairs of the chosen device. The table shows for each repair the Price (the price form), what the Customer pays, the Margin, the Parts and the Duration. With the search field you search by device, model code or repair.
- List and order: all devices one below the other, with the Price table to fill in many fixed prices quickly, Sort newest first and Update model codes.
The toolbar also holds Fill in type and series (while there is something to fill in), Surcharges, Add from catalog and Add Device. Under Surcharges you set the default labour per repair, optionally per brand.
Devices
A device has a brand, a model, a type (Phone, Tablet, Laptop, Watch or Other) and optionally a series, such as iPhone or Galaxy S. Type and series decide where the device sits in the tree of the Workspace. The series also groups the models on your booking page; a device without a series sits under Other.
- With Add Device you add one device: choose the brand, type the model and choose the type. For a model from the catalog Repairflow suggests the series.
- With Add from catalog you pick many models at once and the repairs you offer for them. They arrive with their type and series, and as “price on request” until you fill in prices yourself.
- With Edit device you change brand, model, type, series and model codes. A customer can also search by a model code on your booking page.
- With the switch Visible to customers you hide a device on your booking page without deleting it.
General services without a device, such as data transfer or a diagnosis, go into a service group. It sits in the tree under Services; you create a new one with Add service group.
Type still to choose
Devices that were already in your menu before there were types have no type yet. They sit in the tree under Type still to choose. With Fill in type and series (in the toolbar and on the overview card; the number is how many devices it can fill in) Repairflow fills in an empty type from the catalog or from the name, such as tablet for an iPad and laptop for a MacBook, and an empty series for models from the catalog. What is already filled in always stays. What it does not recognise, you choose yourself with Edit device or by dragging the device.
Order and moving
- Drag a device in the middle column by its handle to change the order. That is the same order as in List and order. It works when you have chosen a brand, type, series or service group in the tree, not while searching.
- Drag a device onto a series, type or brand in the tree to move it. On a series it gets that brand, that type and that series; on a type that brand and that type; on a brand only that brand. On Type still to choose under a brand you clear the type.
- When you pick up a device, its brand opens up completely, so you can drop it straight onto the right series.
- With the keyboard you put the focus on the handle, press Space, move with the arrow keys and drop with Space; Escape cancels. To move a device to another brand, type or series with the keyboard, use Edit device.
- You drag repairs in the table the same way to change their order, except while you are viewing Parts to link.
Repairs and price forms
Click a repair in the table to open it, or choose Add Repair. A panel slides open with the tabs Price and parts, Name and description and Also apply to. On the right of the panel you see under What the customer sees the price as the customer sees it, and under Where this shows whether the repair is on your booking page and at the till.
Under Price form you choose:
- Fixed price: you fill in the Price incl. VAT.
- Parts + labour: the price follows from parts in your stock plus labour. Every part points at an article; the customer pays the sell prices of those articles plus the labour. When the sell price of an article changes, the price in your menu changes with it.
- On request: the customer sees “Price on request” and can still book. After the diagnosis you send a quote.
With Parts + labour you fill in Labour excl. VAT. If you leave it empty, the default labour from Surcharges applies. Below the parts you see what the parts cost, the labour incl. VAT, what the Customer pays and the Margin.
On the tab Name and description are the name of the repair, the repair category, the estimated duration, the description the customer sees under the name and the deposit. You save with Save. If you close the panel with changes that are not saved yet, Repairflow asks whether you want to discard them.
Qualities and Always needed
If you offer a repair in more versions, such as an original screen and a cheaper budget screen, you create qualities. On your booking page the customer chooses one quality, and sees the price per quality. A repair has at most six qualities. Each quality has a name and its own price form: a fixed price, on request or parts plus labour.
With parts plus labour there are two kinds of cards:
- Always needed: the parts every quality needs, such as glue, an adhesive strip or screws. You put them in once and they count for every quality.
- A card per quality: the parts that only belong to that quality, such as the screen itself, optionally with its own Labour excl. VAT.
The labour on the Always needed card is called Labour excl. VAT, default. It applies to every quality whose labour you leave empty.
What happens with the first quality
A repair with parts plus labour and without qualities has one Parts card. When you choose Add quality:
- the parts of that card move to the first quality;
- the card above becomes Always needed, which is then still empty;
- you give the first quality a name, for example Original.
Then put the parts every quality needs into Always needed, and remove them from the quality, otherwise they count twice. Add the next quality with Add quality and give it its own parts. With the arrows on a quality you change the order in which the customer sees them.
If the repair has a fixed price or is on request, the first quality takes over that price form and price.
The price per quality
Per quality the customer pays:
- the sell prices of the parts in Always needed, times their quantity;
- plus the sell prices of the parts of that quality, times their quantity;
- plus the labour, with VAT.
The total is rounded once with your shop setting, the rounding you choose under Wholesale in Basic, for example up to .95. Rounding always goes up. Without a connected wholesaler the total is not rounded, only to whole cents. If one part cannot give a price, because it still has to be linked, the article is inactive or it has no sell price, that quality is on request. Repairflow never calculates with only some of the parts.
An example
Screen replacement for an iPhone, with labour of €30 excl. VAT (€36.30 incl. 21% VAT) and rounding up to .95:
- Always needed: an adhesive strip of €2.95.
- Original: screen A of €89.95. The customer pays €2.95 + €89.95 + €36.30 = €129.20, rounded up to €129.95.
- Budget: screen B of €49.95. The customer pays €2.95 + €49.95 + €36.30 = €89.20, rounded up to €89.95.
If the adhesive strip gets more expensive, both qualities go up. If screen B gets more expensive, only Budget changes.
Adding parts
A part always points to an article in your own stock. If you choose an article from your wholesaler, such as Foneday, Repairflow adds it to your stock with 0 pieces, linked to that wholesaler. The wholesaler’s stock is only shown as information; it never counts as your stock.
Choose Add part on a card. In the dialog:
- Search for the article by name or paste a SKU. At the top you choose All, In your stock or your wholesaler, such as Foneday. An article you took over from your wholesaler earlier is in your stock with “from Foneday”. Articles only the wholesaler has are under “At Foneday, not in your stock yet”.
- The Part name follows the article you choose. If you type a name yourself, it stays. The name is for you; the customer does not see it.
- Choose the quantity (1 to 20) and choose Add.
If no wholesaler is connected, you see a notice pointing to Integrations in the settings. You create your own article under Inventory. Each card holds at most ten parts.
To link
If you cannot find the article, choose Add without article. The part is then marked “to link” and the repair or quality is on request until you link it. You can choose the article for the part later.
- In the tree of the Workspace there is the node Parts to link with the devices that still have something to link, across all brands.
- When you choose that node, the table only shows the repairs with parts to link. With Show all repairs you see the rest again.
- On the overview card, View parts to link takes you straight there.
Also apply to
Once a repair is built well, you put the same structure on other devices with the tab Also apply to. Save your changes first: applying uses the saved version.
- Choose the devices. The devices of the same series are already listed; with the search field you find any other device in your menu.
- Each device shows whether the repair will be created there or an existing repair with the same name will be replaced.
- Choose Apply to. If you replace something, Repairflow asks for a confirmation first.
The qualities, the parts with their quantities and the labour go along, the articles do not: they differ per device. On the other devices the parts are marked “to link” and the price is on request until you link them. The result shows per device what happened and how many parts still have to be linked.
What the customer sees
- On your booking page the customer sees one price per repair, or one price per quality, or “Price on request”. On the tracking page, the job ticket, the receipt and the invoice the repair is one line with the total price.
- If you choose Fixed prices only under Show repair prices in Online booking, a parts + labour repair shows “Price on request”; only prices you set yourself stay visible. If you show part availability, it follows the least available part.
- The customer never sees which parts are in it, what you buy them for or from which wholesaler. The name of a part also stays inside your shop.
- A hidden device or repair is not on your booking page, but stays saved in your menu.
Who can do what
- Owner and Manager: set up the whole repair menu.
- You only see the Margin column (excl. VAT) and the margin on the cards if you may view reports.
- Technician: does not see the repair menu.
Tips
- Start with Add from catalog: your devices are then in the right type and series straight away.
- Put glue, adhesive strips and screws in Always needed, not in every quality separately.
- Work through Parts to link regularly: as long as something is left to link, the customer sees “Price on request”.
- Use Also apply to for a whole series and then link the right articles per device.
Updated on